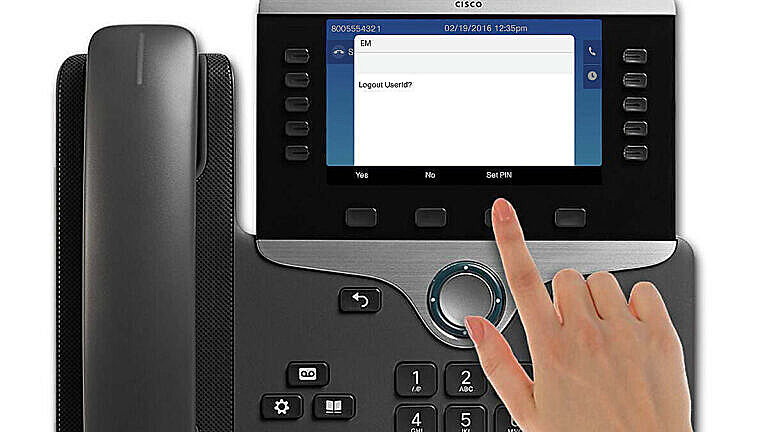
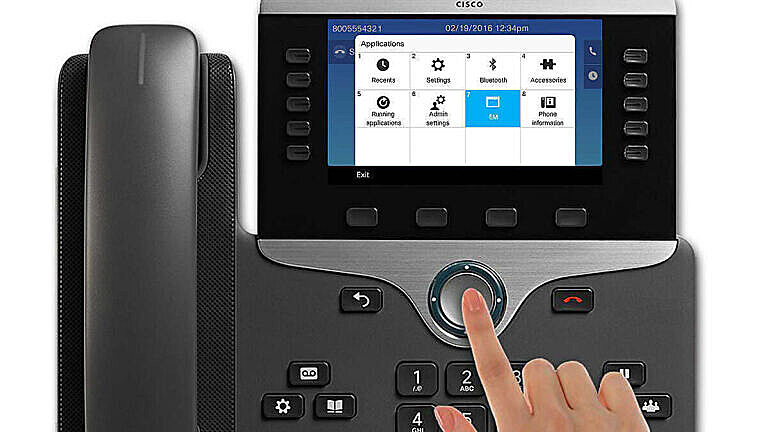
We offer Cisco 8861 rentals instead of the Cisco 7965 on your desks. All private office or dedicated desk owners can take advantage of this upgrade. New models have more functions, look better, and have a sharper screen. To learn more about our VoIP services, please visit here.
Teams is complimentary
To add Cisco 8861 to your shopping card and rent it monthly, please visit this link (Members only). We will configure the new VoIP phone for you immediately.
Telephone Services Upgrade Cisco Phone Model 8861 #
- Supports five lines
- Ergonomic design
- Can easily pair with your cell phone
- Compatable with wired, DECT wireless or Bluetooth headsets
- 720p HD video and wideband audio for crystal clear video and voice communications
Basic Features #
Phone Screen #
Your Cisco 8845 model IP Phone includes a handset with light strip that flashes for an incoming call or remains lit when you have new voicemail.
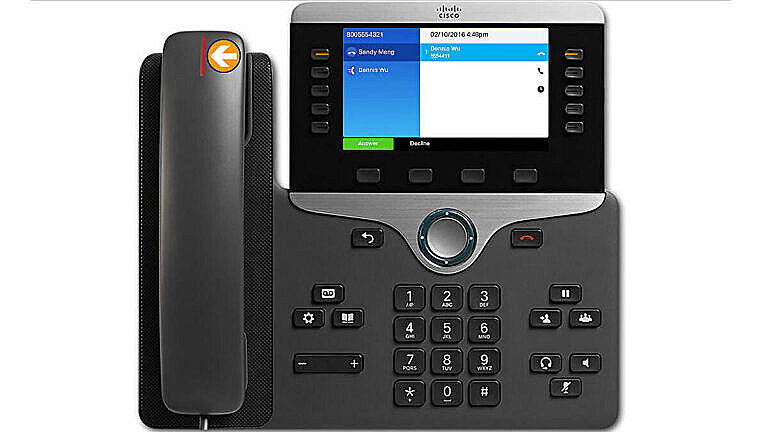
The Phone Screen shows information about your phone, displays the date/time, your phone number, line status with caller ID and the softkey options.
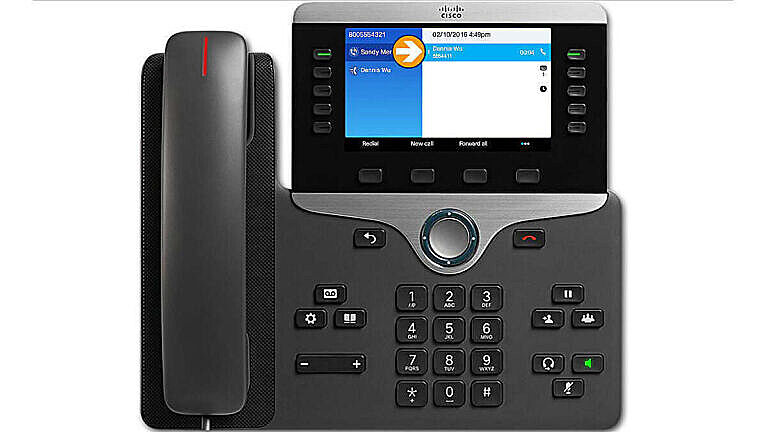
Programmable Line Keys #
The buttons here are Programmable Line Keys, used to view calls on a line. Any buttons not being used as line keys may be used for Speed Dials or features. On the 8861, if Intelligent Proximity is turned on, the second button is reserved for a mobile phone.
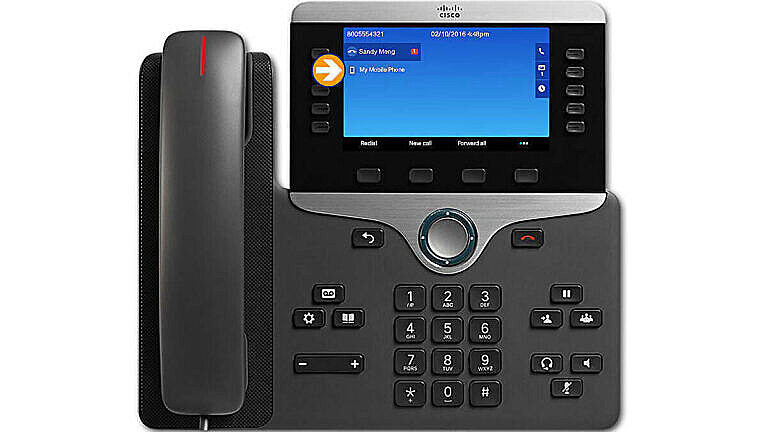
Session Buttons #
Session Buttons are used to perform tasks such as answering a call, resuming a held call, or initiating phone functions such as displaying missed calls. Each call on your phone is associated with a session button.
Buttons illuminate to indicate status:
- Flashing amber is an incoming call
- Steady green is an active call
- Flashing green is a call on hold
- Steady red is a shared line in use remotely
- Flashing red is a shared line call put on hold remote
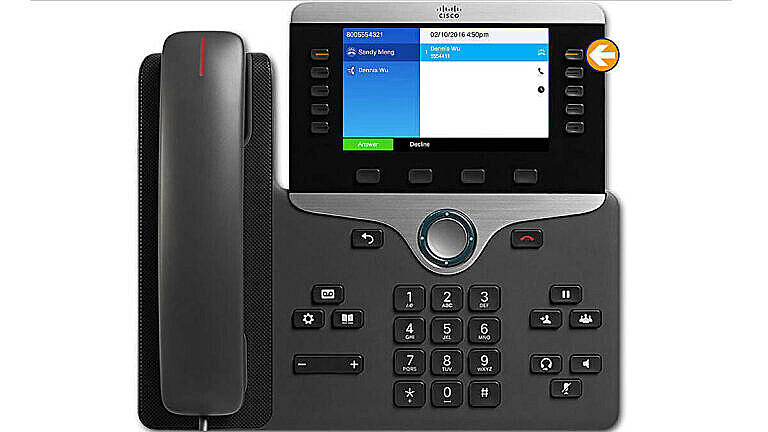
Soft Keys #
Soft Keys perform a variety of function and calling options, and change depending on the state of the phone. The soft key on the far right displays more soft keys. Your organization has many options for presenting soft keys to you. The screens on your phone may show the same keys in a different arrangement than shown in this training module.
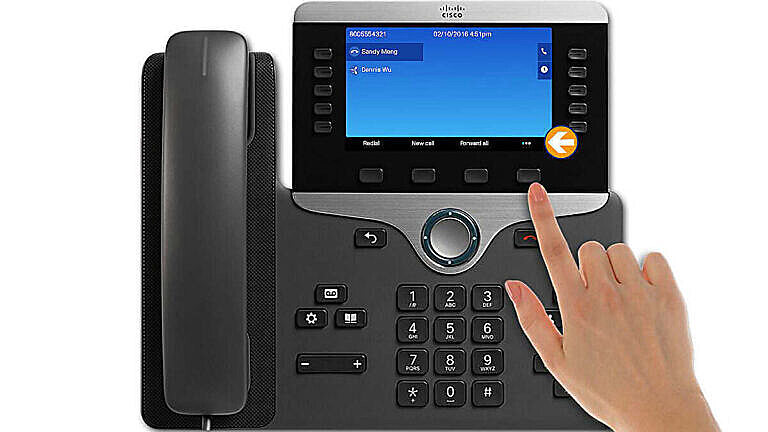
4-Way Navigation #
Four-way Navigation Key and “Select” Button – Allows you to scroll up and down through linear menus.
Or, left and right as well as up and down on grid menus.
- Use the “Select” button to select a highlighted option.
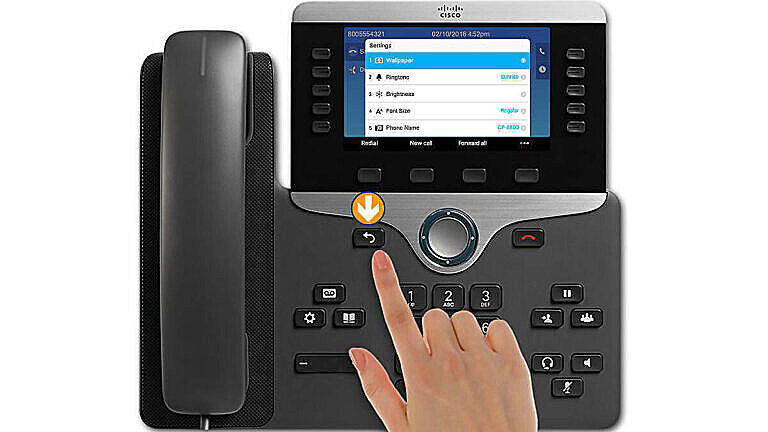
- Back Button – returns to the previous screen or menu.
- Release Button – ends a connected call or session.
- Feature Buttons – The dedicated buttons on the left provide access to Voicemail, Applications and Directories. The Feature Buttons on the right are used to Hold, Transfer and Conference.
- Keypad – Allows you to dial phone numbers and enter letters.
- Volume Button – Used in coordination with the sound control buttons to control the speaker, headset and mute.
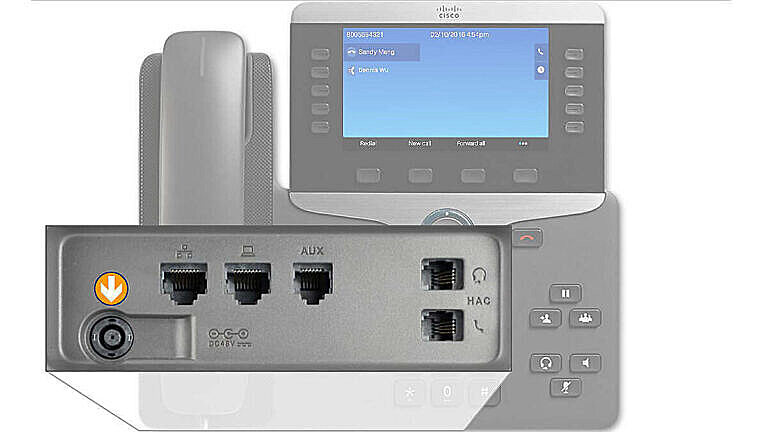
Ports in the Back #
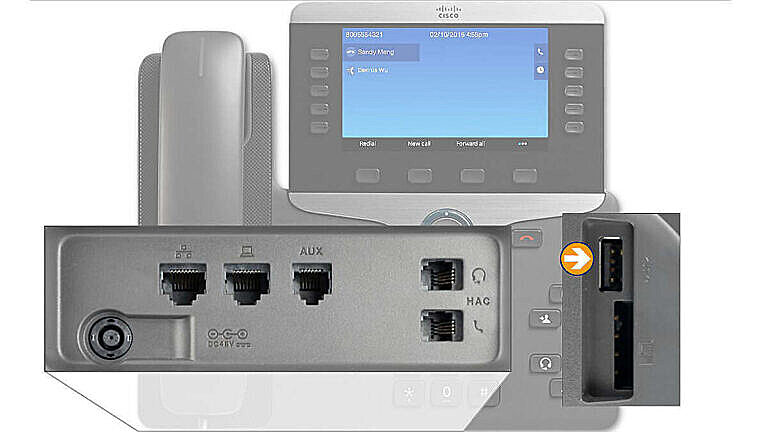
The back of the phone includes a DC adaptor power port, a network port and an access port connection for a PC, an auxiliary port where you can connect an EHS cable, a headset and a handset port. The DC adaptor comes separately and is only required if there is no Power over Ethernet provided or if the power use planned for the phone exceeds the capacity of Power over Ethernet.
Headset Support #
The 8851 & 8861 models have Bluetooth headset support and compatibility for key expansion modules. The 8851 has a side 2.5-Watt USB charging port for cell phones or connecting USB headsets. The 8861 has the side port, and ports for external microphone and speakers, as well as a 10-Watt Fast Charging USB port in the back, which can be used to charge phones and tablets. The 8861 also supports Wi-Fi for situations where wired Ethernet is not available or convenient.
Sound Control #
Volume #
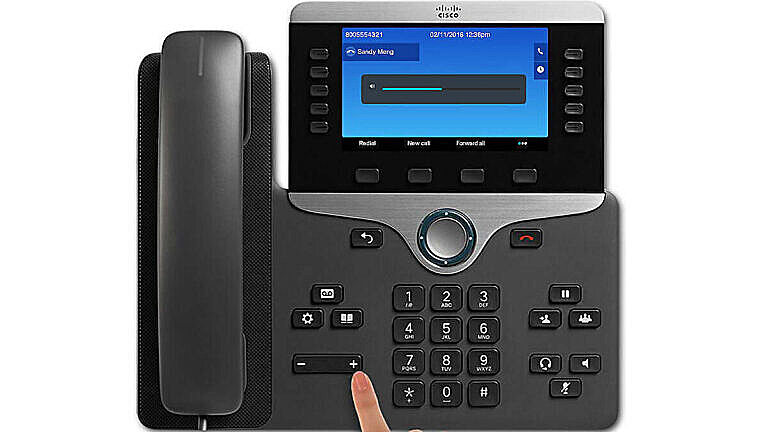
Press plus or minus on the Volume button to adjust the volume. For example, to adjust the volume of the ringer, from the idle phone, press plus or minus until the desired volume is achieved. The same process can be repeated to adjust the volume for the handset, headset or speaker. When changing the headset volume; note the headset icon in the top right.
Mute #
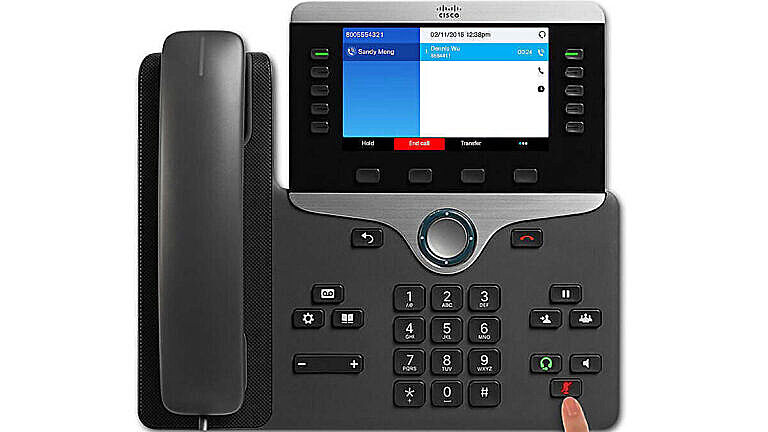
Press “Mute” to mute a call in progress. When the microphone is muted, the button illuminates red. To take a call off mute, press “Mute” again. It’s a good practice to look at the mute key before speaking on a call, to make sure you’re not speaking while muted.
Speaker #
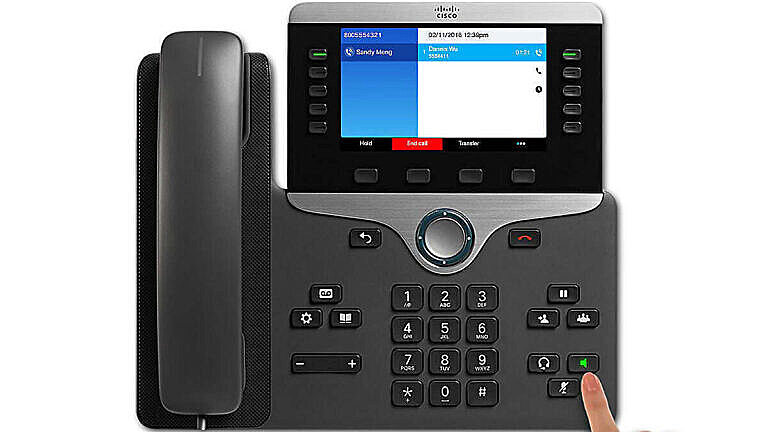
Press “Speaker” to use the speakerphone. To take a call off speakerphone, lift the handset, or if you have a headset, press the headset button.
Headset #
This key is used to answer and end calls using the headset connected to the phone. The button is lit and the headset icon appears in the top bar when the headset is activated.
Ringtone #
Settings #
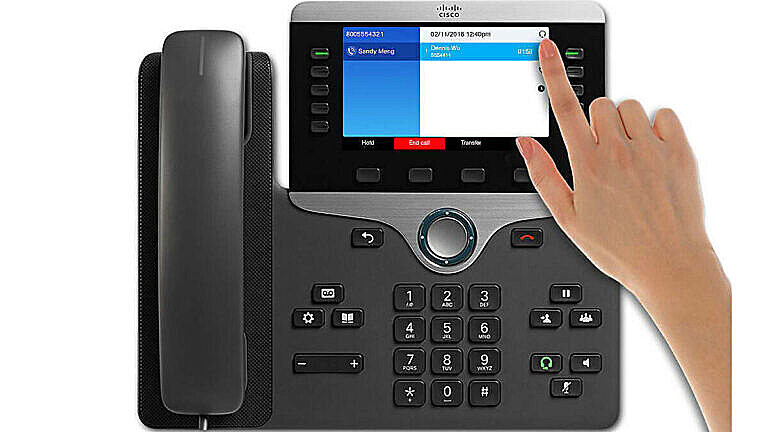
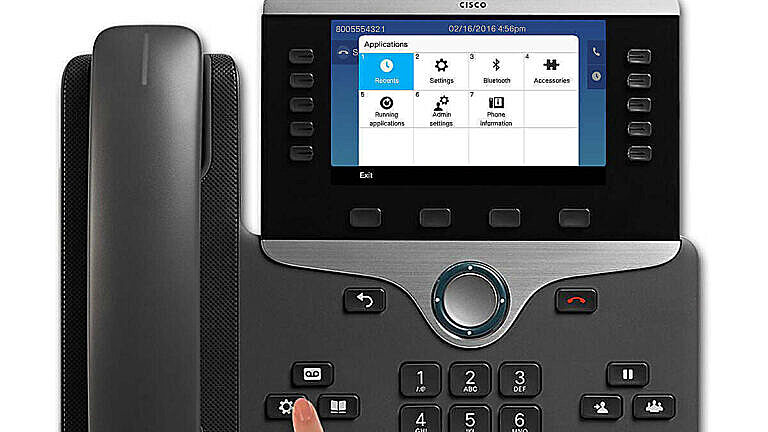
To change the Ringtone, press the “Applications” key.
Use the Navigation Key to scroll and select Settings.
Note how the selected ringtone is listed at the right. The arrowheads tell you there are more items below each of these menu items.
Select Ringtone #
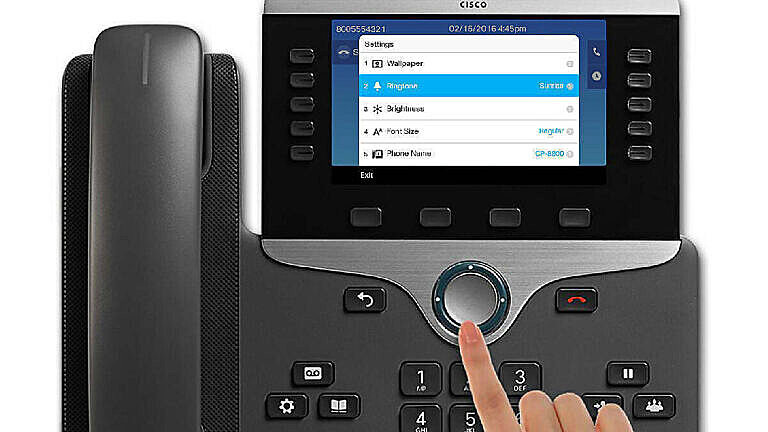
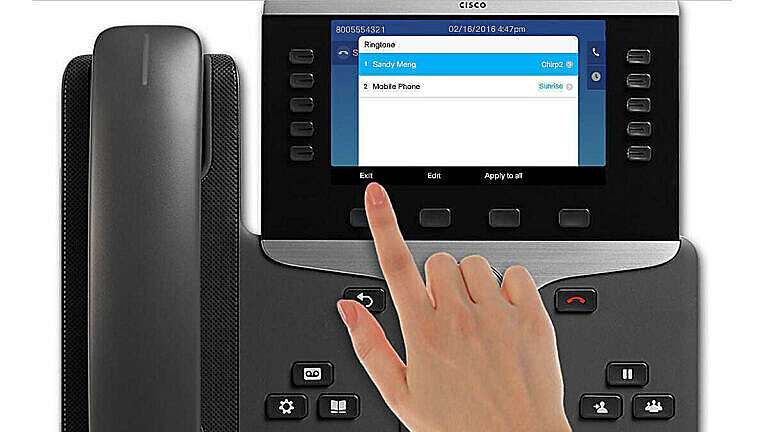
Select Ringtone, and if you have more than one device connected, choose which one to change. You can have different ringtones for calls coming in on the desk phone and for calls coming in on your mobile phone. Press select to view the options for your desk phone.
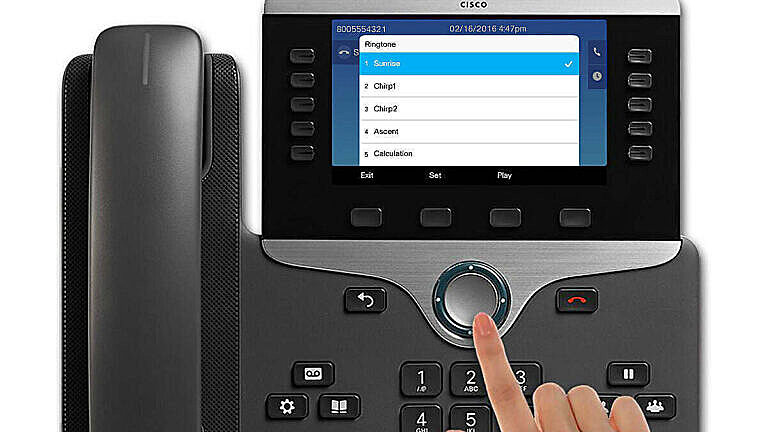
Note: the current selected ringtone name will be highlighted and checked.
Use the Navigation Key again to scroll through the list of ring types, and press the “Play” soft key to hear a sample of the selected ring type. When you find the desired ring, press the “Set” softkey to apply the ringtone.
Apply and Exit #
Apply to all lets you make the same ringtone standard for both devices, or across all of your lines.
Press Exit repeatedly to return to the main phone screen.
Brightness #
Get to the Menu #
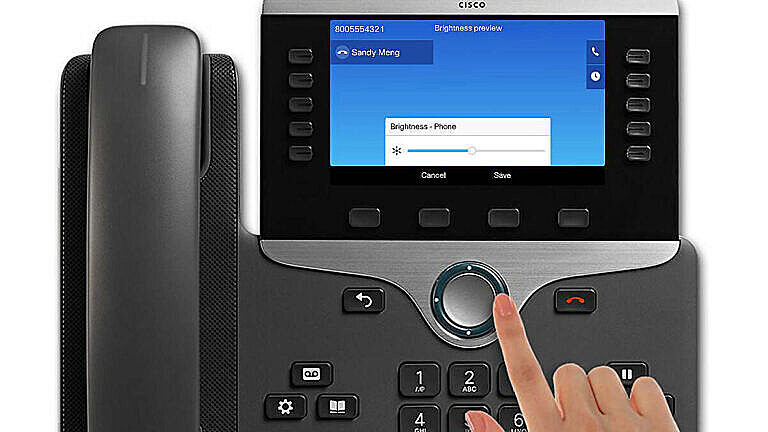
By default the brightness is set to 50 percent. To adjust the Brightness, press the “Applications” key. Use the Navigation Key to scroll and select Settings. Or if you had Settings selected the last time you were here, it is already highlighted. Then select Brightness.
Adjust and Save #
Press the Navigation key to the right to increase, or to the left to decrease the brightness.
Press the “Save” softkey to set the level or “Cancel” to exit without saving.
Answer Calls #
Incoming Calls #
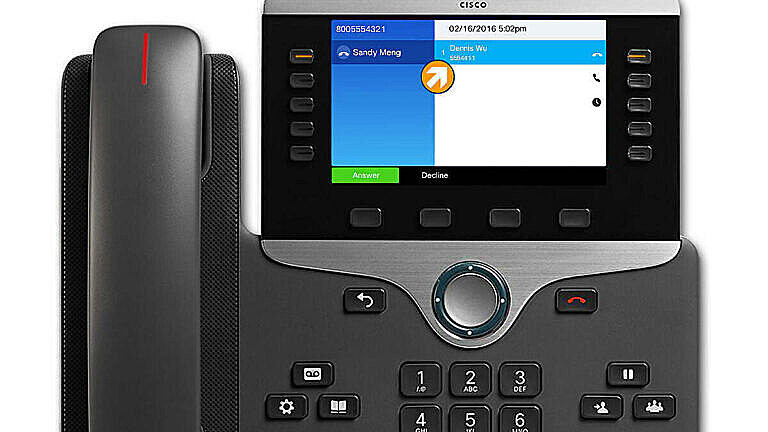
When a new call rings on your phone, you will see a few indicators. A flashing light on the handset, a flashing light on the line button, and a ringing call icon displays with caller ID Information.
You can use the “Decline” softkey to redirect a ringing call to your voicemail or to a predetermined phone number.
Talk to People #
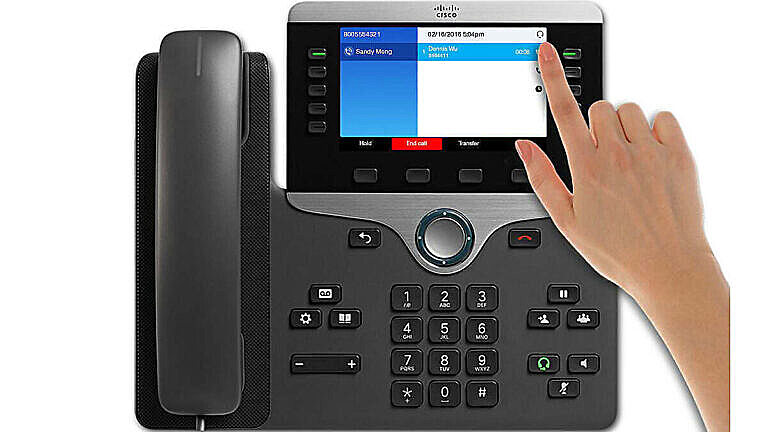
There are three ways to talk to people on your phone. You can use the handset, a headset or the speakerphone. When the phone rings, you can pick up the handset and simply start talking to the person who is calling you. If you are a headset user and your headset has built in controls on it, you can answer the call from your headset. Make sure you have pressed the headset button to send the sound to your headset. Your phone will stay in headset mode for the next call as well. If your headset does not have built-in controls, make sure the headset button is lit, then press Answer to answer the call. Some people prefer to use the speakerphone. You can press the speakerphone button to answer a ringing call. Some people like to press the session button to answer calls. You can do that as well.
The call now shows the connected call icon, and the call timer is displayed.
Second Call #
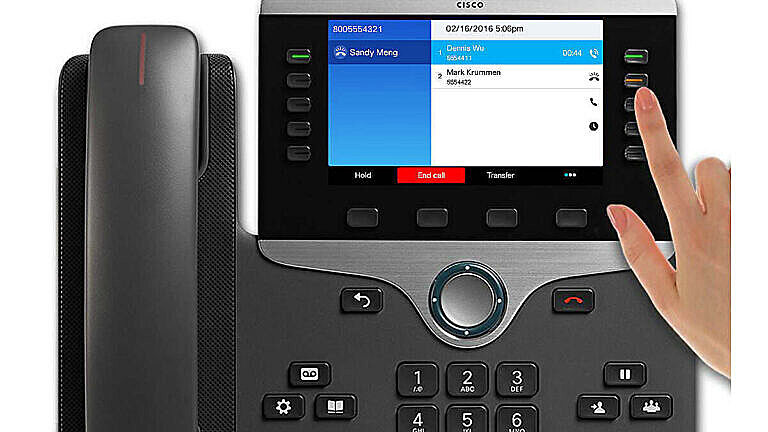
If a second call comes in while you are already on a call, a second session label displays. To answer a second incoming call, you must press the blinking session button to answer the second call. To “Decline” an incoming call while on another call, scroll down to it and press “Decline.” Or, while it is selected, you can select Answer, and the first call will automatically be placed on hold.
Switching Between Calls #
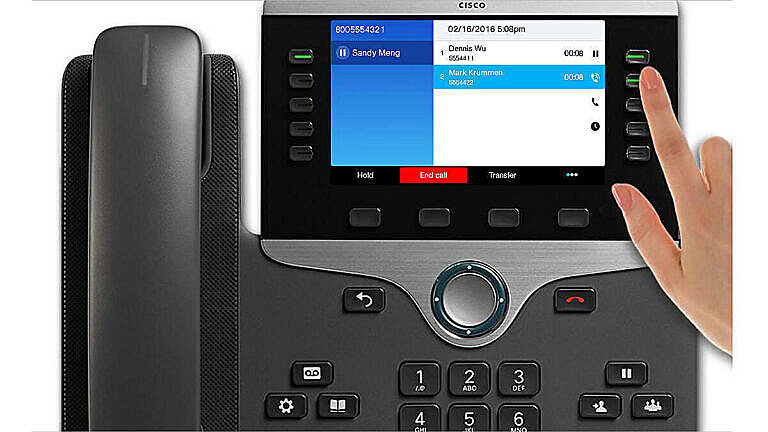
To switch between connected calls, press the blinking session button of the held call to swap between calls, and the other call will automatically be placed on hold.
Ending a Call #
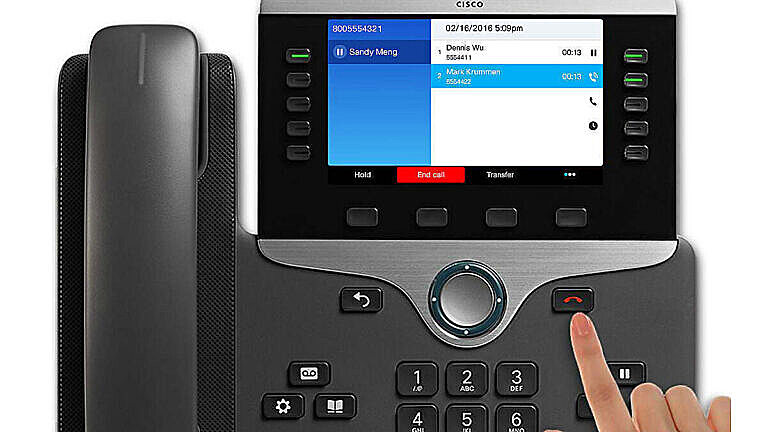
To end a call, press the Release button, or the “End Call” softkey. To end a call on hold, you must resume the call first. Then you can hang up the handset, or if you’re on a headset or speakerphone, press the selected audio path key.
Make Calls: #
Dialing #
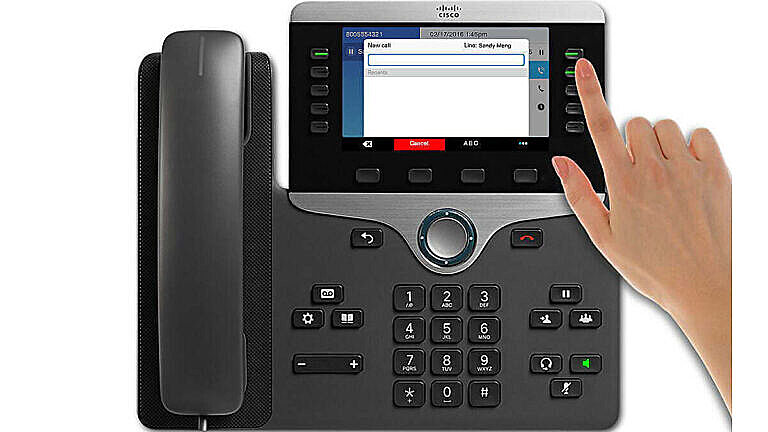
To pre-dial, enter the number you wish to dial.
If you make a mistake while dialing, use the “backspace” softkey. As you begin to dial, the phone will search for similar numbers. Instead of dialing the full number, you can scroll down to a match if that is who you want to call. Next, go off hook by either lifting the handset, press the headset button, or press the “Call” softkey.
To place a call while another call is active, press the “New Call” softkey, and the first call will be placed on hold automatically. These phones won’t let you accidentally hang up on somebody by placing a new call.
Outside Calls #
To make an outside call, hold down the star key for two seconds to get the plus sign for “plus dialing.” Then enter the full local or long distance number and press the “Call” softkey.
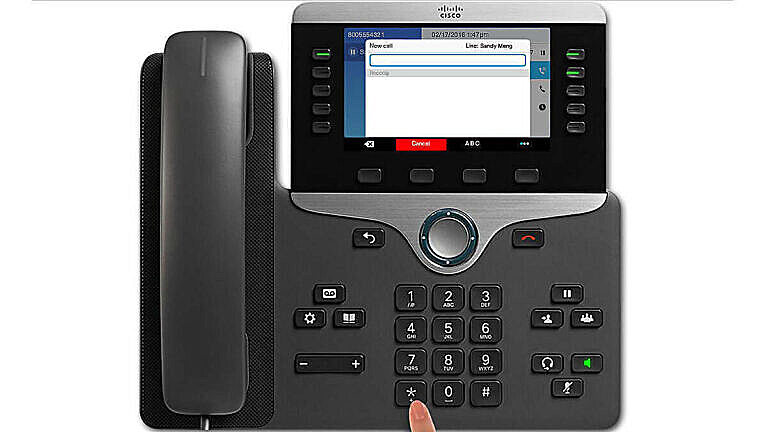
Soft Keys #
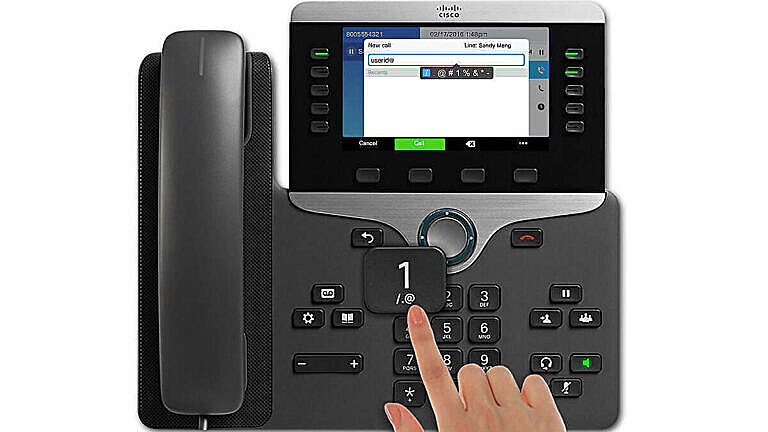
The “ABC” softkey enables T-9 text input entry, which is useful for URI dialing. For example, to dial an email address in a directory, the 1 key provides the @ symbol for [email protected].
Use the “Redial” softkey, to dial the last number placed from the phone.
If you have setup speed dials, press the appropriate feature button.
Busy Signal #
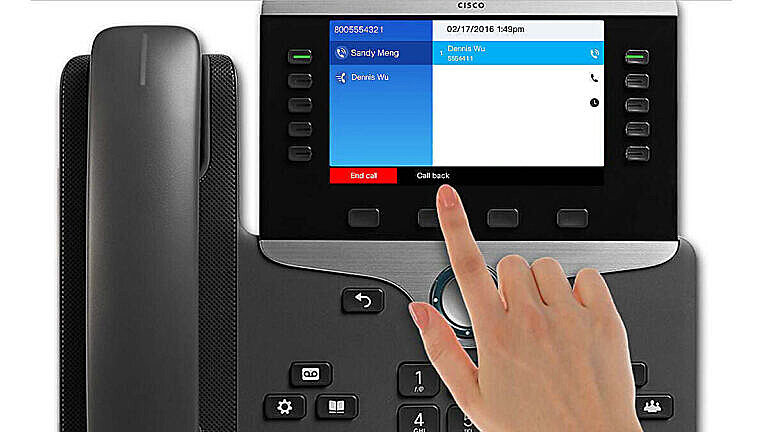
If you try to reach someone and you get a busy signal or voicemail, or the call is not answered, you may use the Call Back feature to let you know when that person is available to talk. If enabled, call back appears on your phone as a feature button or a softkey. While listening to the busy tone or a ring sound, press “Call back.” A confirmation screen displays on the phone. Press “Exit” to exit the confirmation screen. When the person you are trying to reach becomes available, you will receive an audio and a visual notification on your phone when the line is free. Press “Dial” to place the call again. For more information about the Callback feature, contact your system administrator.
Hold and Transfer Calls #
Hold #
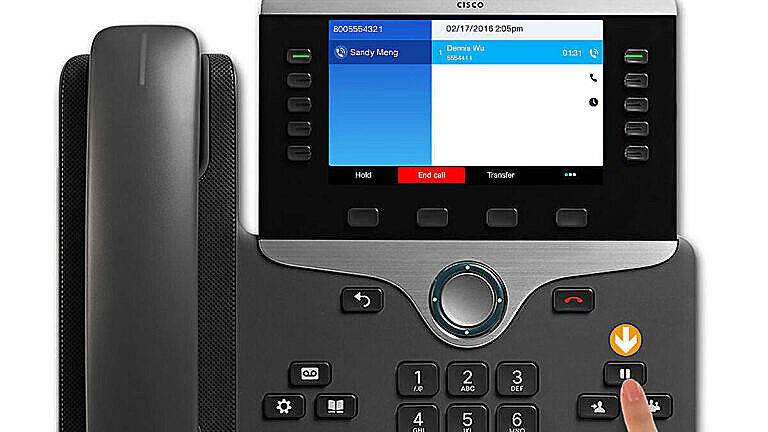
To put a call on hold, press the “Hold” key. The hold icon appears and the LED indicator pulses green.
To resume the call, press the “Hold” key again, or press the pulsing green session button. You can also use the soft key to put a call on hold, as well as resume a call on hold.
Transfer #
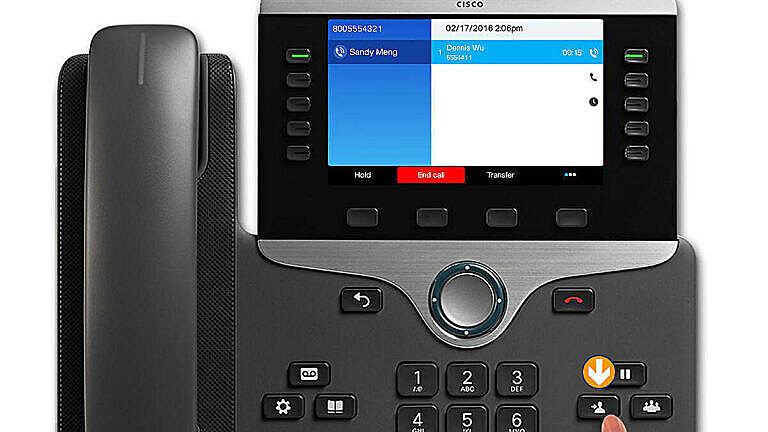
To transfer a connected call, first press the “Transfer” key. The call will be placed on hold. Then dial the transfer recipient’s number.
Forward Calls #
Forward All #
“Forward All” allows you to forward calls on your phone to another number. For your primary line, you can set up “Forward All” directly on your phone.
Setup #
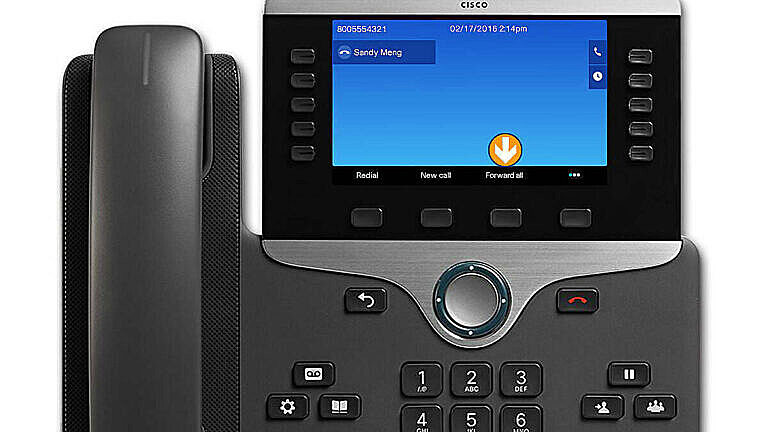
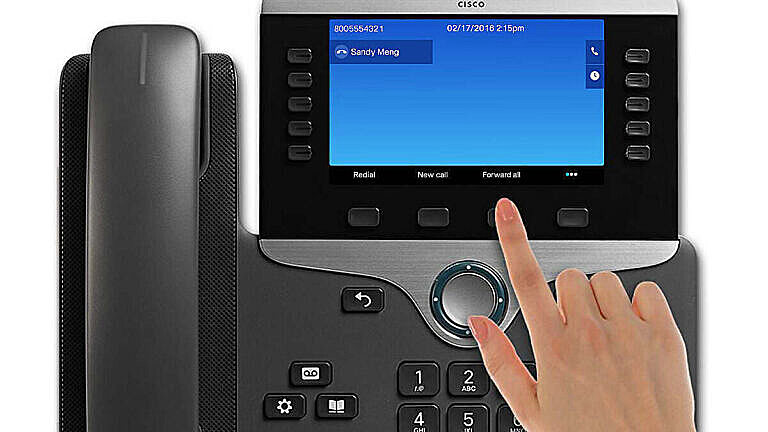
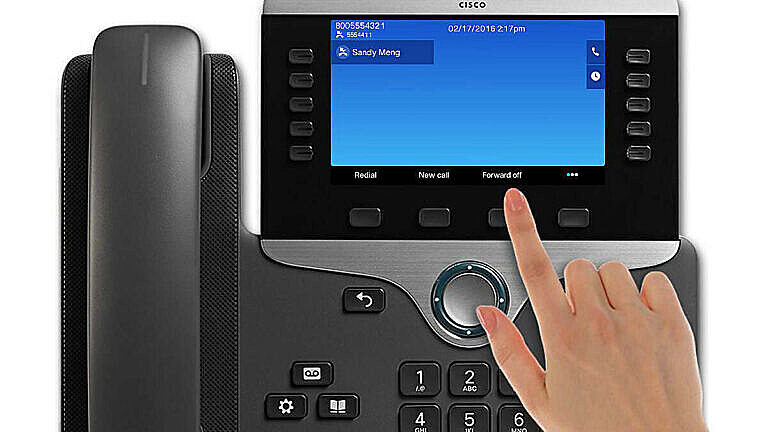
To forward all calls, press the “Forward All” softkey.
Then enter the call forward target phone number exactly as you would dial it from your phone.
Verify #
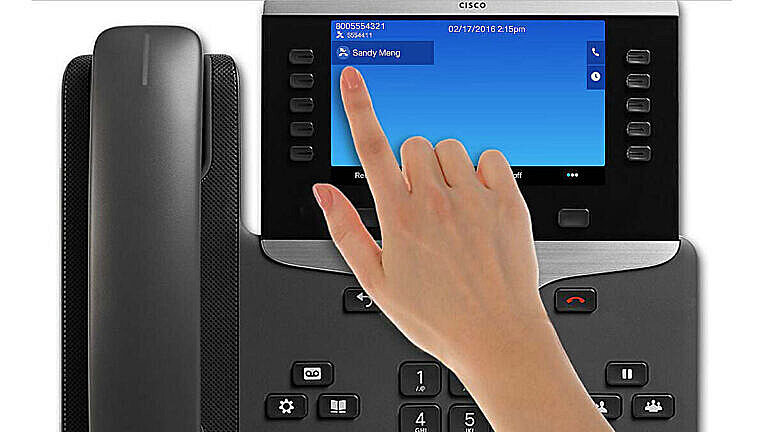
To verify that your calls are forwarded, look for the “Forward All” icon in the line label, and the forwarding information in the header.
Cancel #
To cancel call forwarding, press the “Forward Off” softkey.
Conference Calls #
Begin #
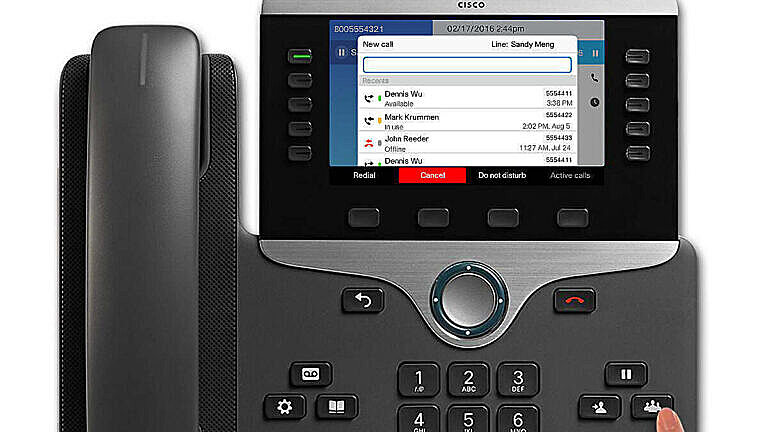
Use the Conference feature when you want to connect multiple callers. While on a call, press the “Conference” key.
- Enter a participant’s phone number.
- After the phone begins to ring, press the “Conference” key again to begin the conference call. You can also use the soft keys to initiate and connect a conference call.
The conference begins and the phone displays “Conference” instead of caller ID. Repeat the steps to add more participants.
Combine #
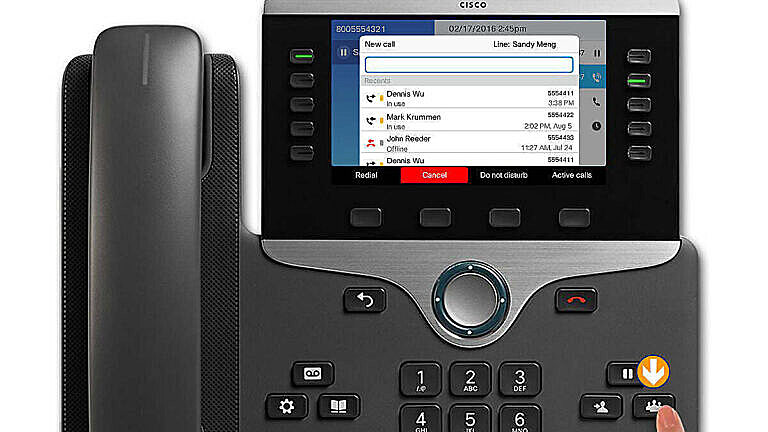
When you want to combine existing calls that are already on your phone (connected or holding), use the “Conference” key.
- While on an active call, verify that you have two connected calls.
- Press the “Conference” key.
- Press the “Active Calls” softkey.
- A screen will appear with available active calls, select the call you want to add to the conference, and press the conference key or softkey.
- The conference begins and is established on the line with the active call.
Features #
Remember, if you place a conference call on hold, all members of the conference call may hear hold music. Use the mute button instead. When getting ready to speak on the conference call, check the mute key first to make sure you’re not muted.
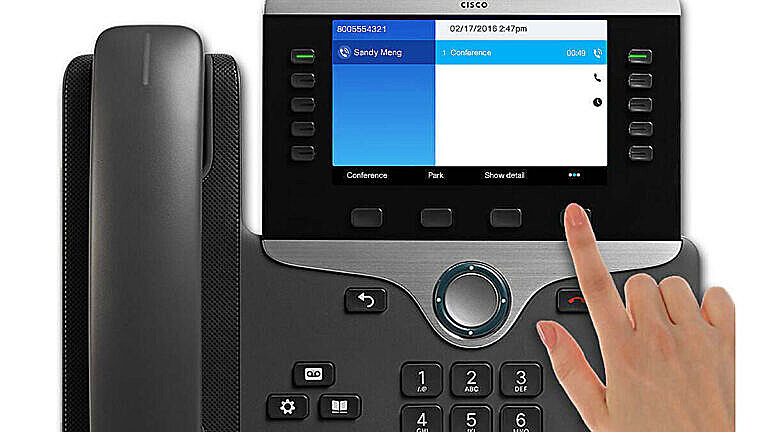
To view and remove conference participants during a conference, press the “Show Detail” softkey. To remove a participant from the call, highlight a name and press “Remove.”
The conference ends when all participants hang up.
Conference #
Press to make a conference call.
Additional Features #
Directories #
The Cisco IP Phone 8861 Series provides you with access to contacts using the Personal and Corporate directories. To view these directories, press the Contacts button.
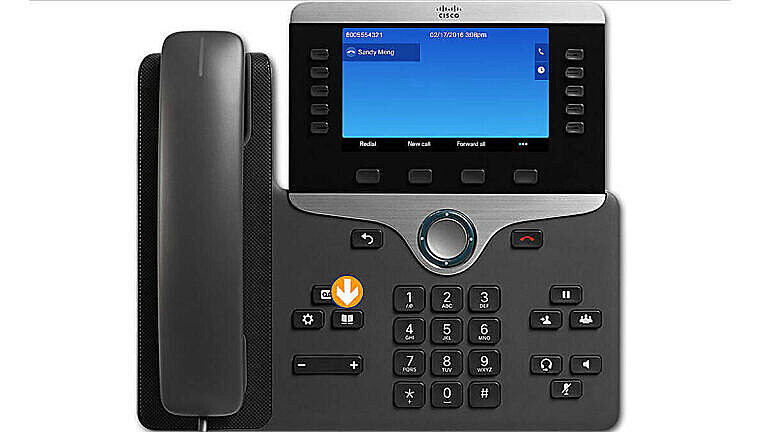
Personal Directory #
The Personal Directory will allow you to access your Personal Address Book and Fast Dials. You can set up and maintain your Personal Directory using your phone, or by using your Self Care Portal webpages.
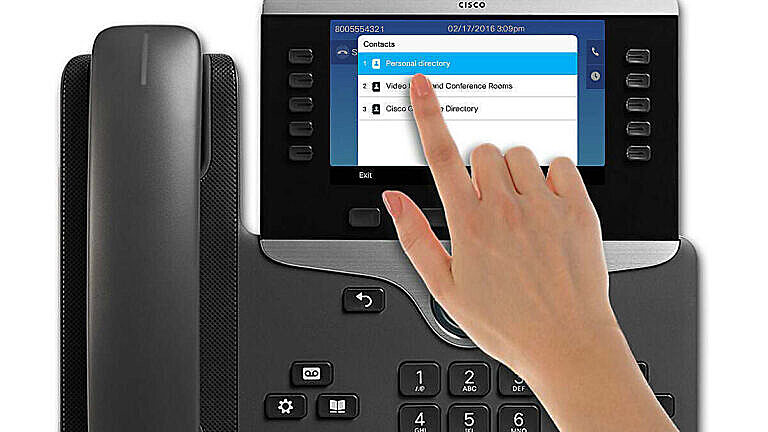
Corporate Directories #
The Corporate Directory will allow you to access employee names and phone numbers. You can search for a co-worker’s last or first name, and then dial that number from the Corporate Directory.
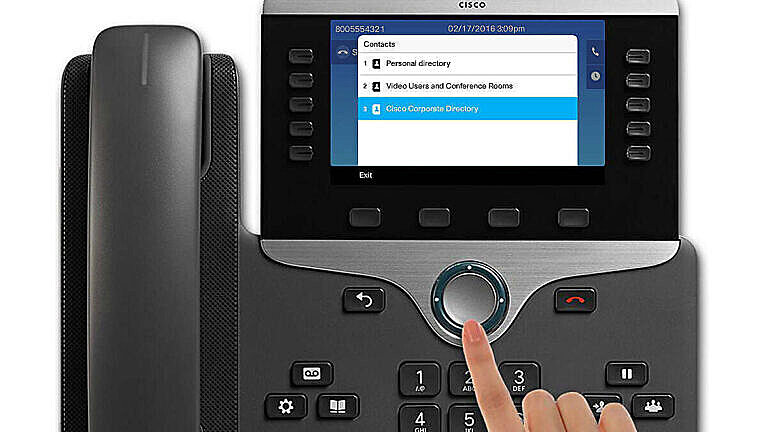
View Recent #
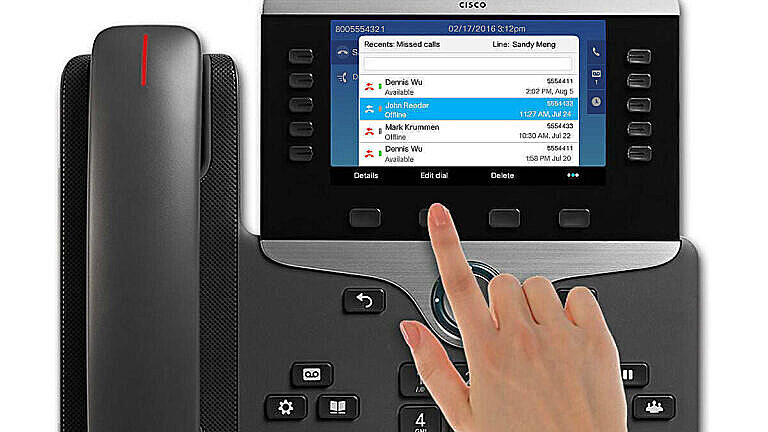
To view missed, placed, or received calls, press the “Applications” button and select “Recents.”
The last 150 calls display. To sort by missed calls, press the “Missed Calls” softkey. To dial from Call History, with the Navigation Key scroll to a call, and press the “Select” button or the “Call” softkey.
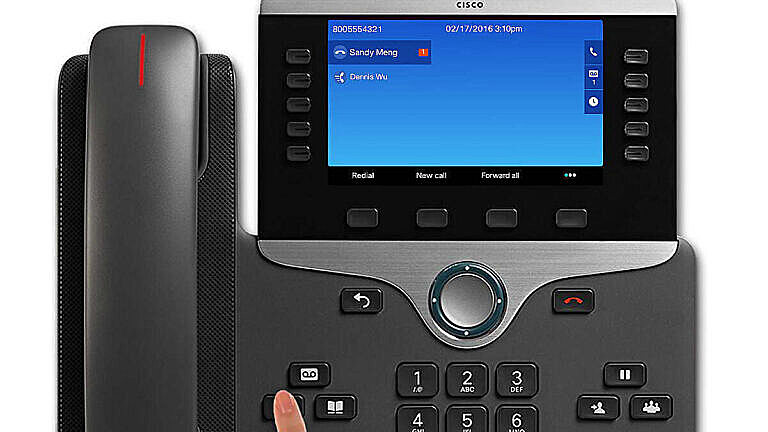
Edit and Delete #
Press “Edit Dial” if you need to edit the number to add an outside line number or long distance access code. To view details for a call, highlight the call and press the “Details” softkey.
Press “Delete” to delete an individual call record from the list.
You can clear the missed call history list by selecting “Clear list” (you may need to press the “More” softkey first). Or, if you would like to clear the entire call history, select “All Calls,” and then press “Clear list.” You will be asked to confirm. Press “Delete” to delete the Call History list, or press “Cancel” to go back to the Call History screen.
Single Shared Line #
- If you share a line with a co-worker or an Administrative Assistant, you share a phone number.
- Either you or your co-worker can answer a ringing call on the shared line.
- When your co-worker has a call on the shared line, your shared line button is solid red.
- When your co-worker puts a call on hold, the session button on your phone pulses red. You or your co-worker can resume the call.
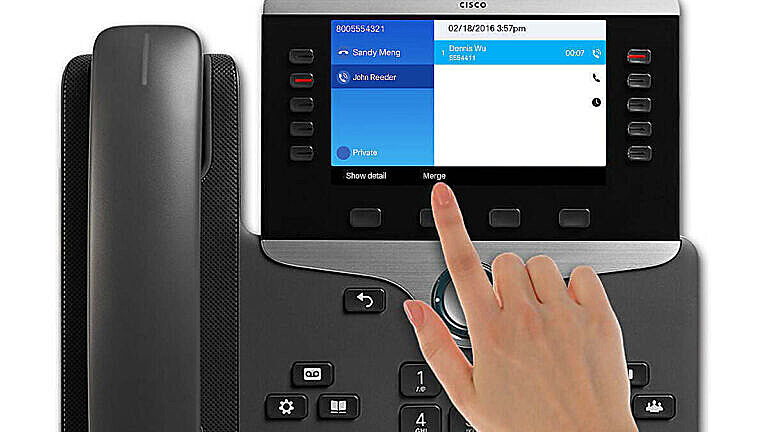
- They can also “Merge” with a call that you are handling on the shared line. Merging a call means joining your call by turning the call in to a conference. You will typically hear a beep and your phone screen will change to display conference details.
- To prevent this from happening, use the “Private” feature button. To verify that Privacy is enabled, look for the “Private” enabled icon next to an amber line button. This will block others who share a line with you from being able to merge in on your shared line call. Press the “Private” feature button again to disable.
Multiple Shared Lines #
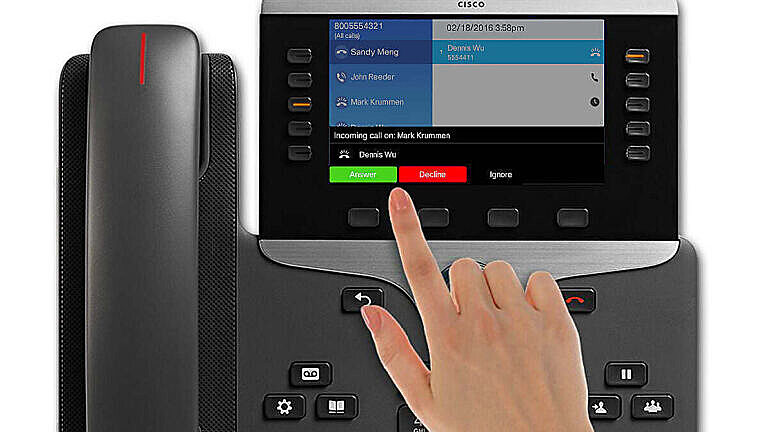
For people who have multiple shared lines or deal with many incoming calls at a time, there is an optional view for an incoming call, which is very helpful. If you would like this view, ask your system administrator to enable “Actionable Incoming Call Alert.”
Answering calls In-Group #
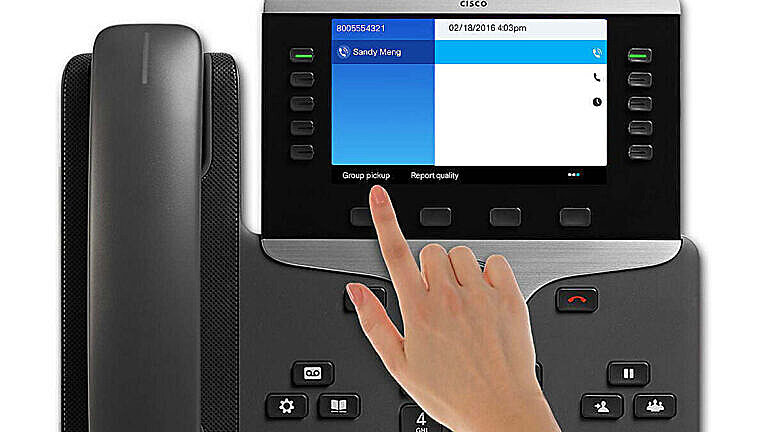
To answer a call that is ringing another extension within your group, press an available session button, and the “PickUp” softkey, you may need to press the “More” softkey. The call now rings on your phone.
Answering on Another Extension #
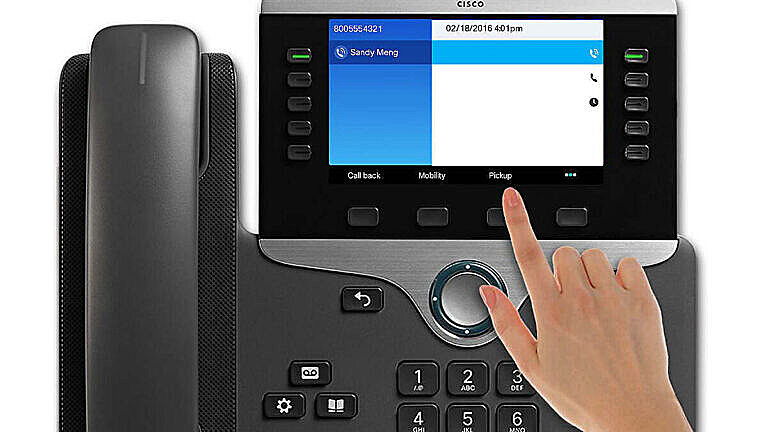
To answer a call that is ringing on another extension outside of your group, press an available session button and the Group PickUp softkey. Enter the call group pickup code number provided by your system administrator. The call now rings on your phone.
Answering on Mobile #
We’ve set up the phone so that incoming calls will ring at your desk phone for the first two rings and then simultaneously at your desk and on the mobile phone for the remaining three rings.
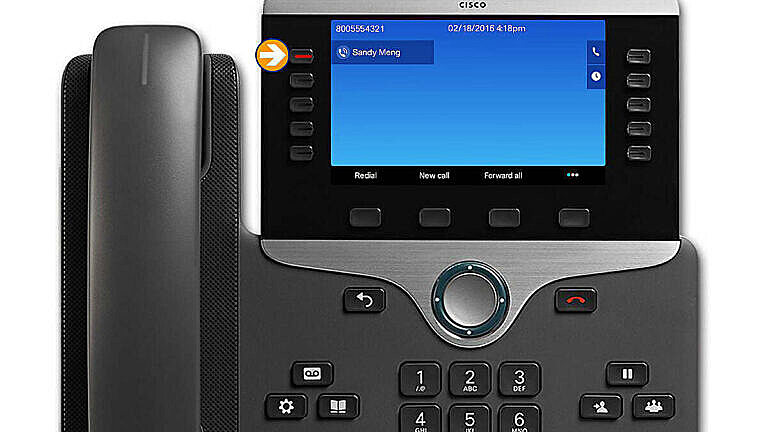
Answer the call from your mobile phone, the desk phone line will illuminate red.
To transfer the call to the desk phone, hang up the mobile call. The desk phone line will illuminate to flashing green.
Resume via Desk Phone #
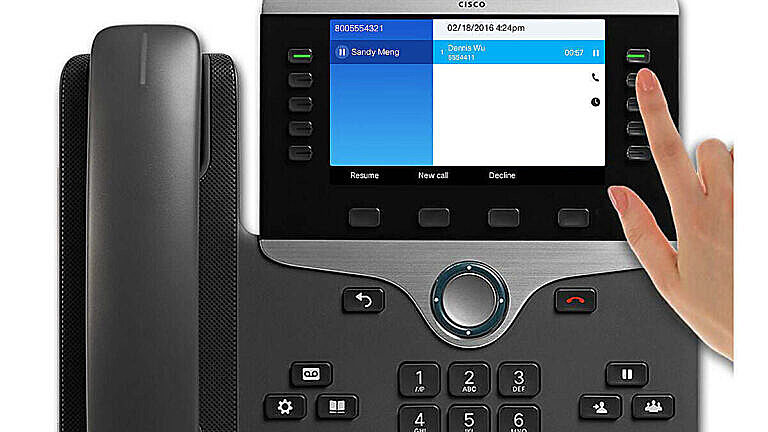
Here, we’ve set up the phone so that it must be answered within 10 seconds after hanging up from the mobile phone before dropping the call.
To resume the call, press the corresponding desk phone line that is flashing green and select the Resume softkey.
Desk to Mobile Phone #
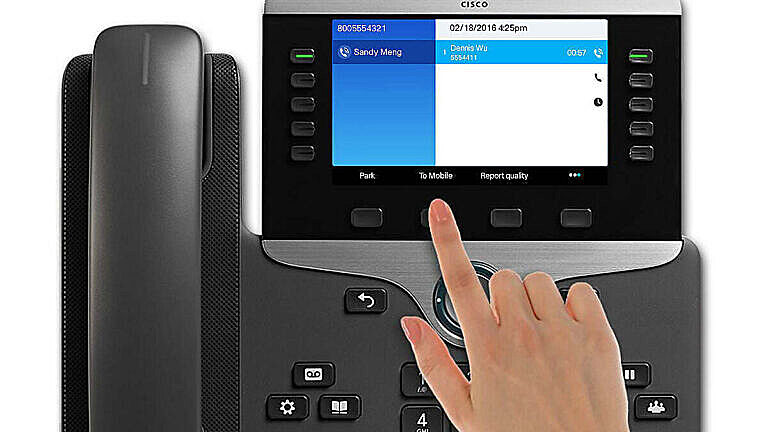
To send a call from your desk phone back to your mobile phone, on your desktop phone press the “To Mobile” softkey (you may need to press the More softkey) and select Send call to mobile.
Note: The desktop phone line button turns red and the calling party number appears on the phone display.
Park Calls #
Store the Call #
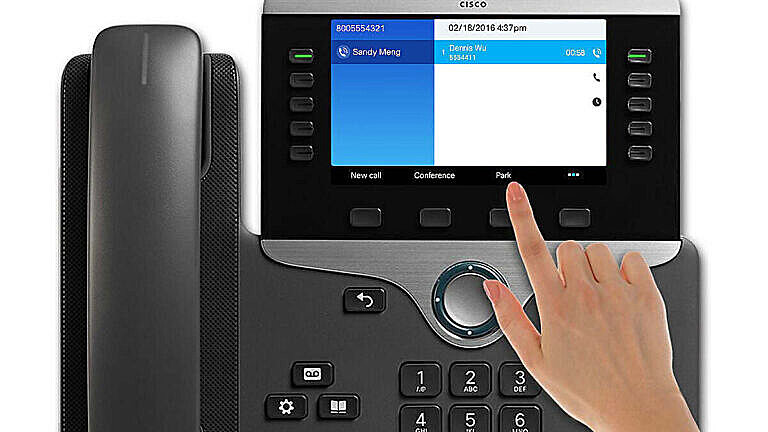
The Park feature allows you to store or Park a call at a specified number, and then use any other phone in the office to retrieve the parked call.
While on a call, press the “Park” softkey, you may need to press the “More” softkey first.
Retrieve the Number #
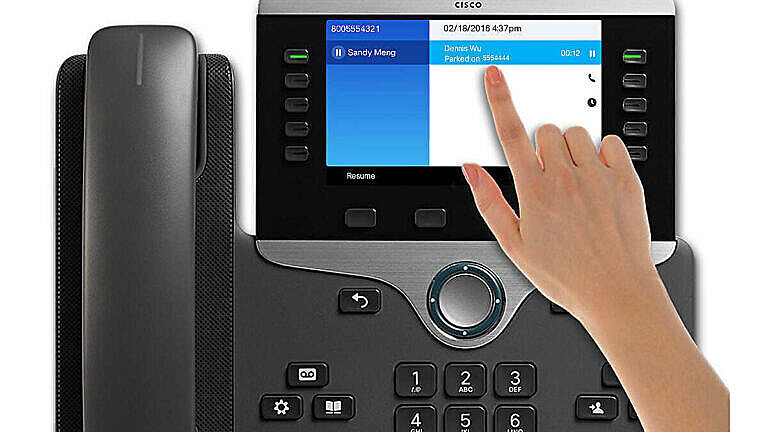
The park number will be displayed on the screen. Make note of the number and dial the number from any phone to retrieve the parked call.
The call will ring back to the station that originated the call if it is not picked up.
Bluetooth and Mobile Integration: #
Bluetooth in Applications #
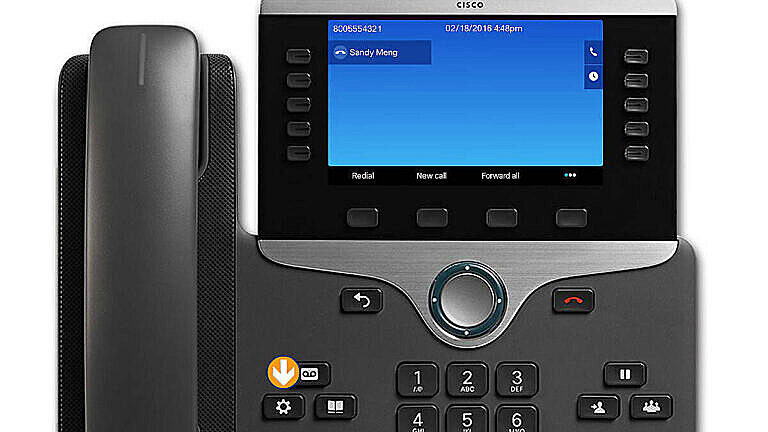
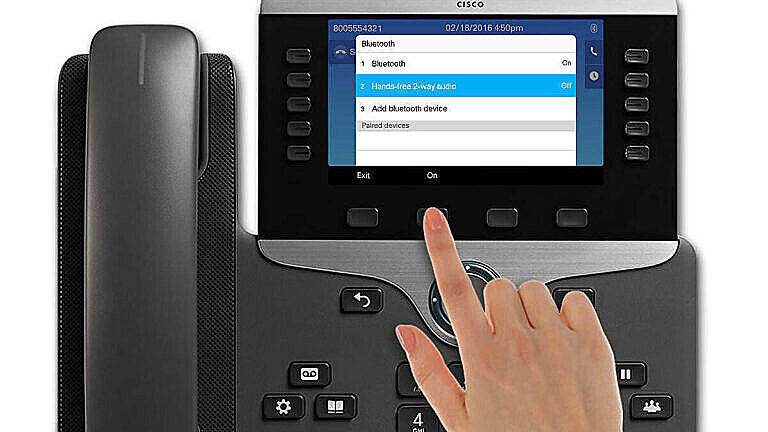
Select the Applications key, then navigate to and select “Bluetooth.”
Turn Bluetooth On #
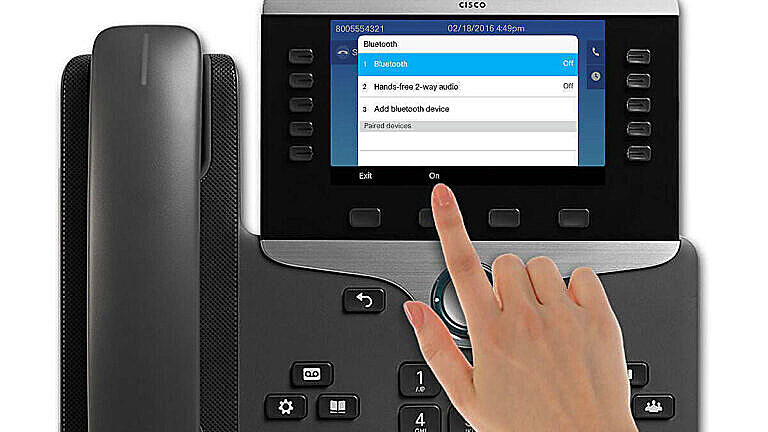
Before adding a device, you want to turn Bluetooth on. You will see the Bluetooth icon display in the top right corner.
Hands-free 2-way Audio #
Next, turn on Hands-free 2-way audio. This will allow your mobile phone to answer calls from your desk phone, and your desk phone can be used to answer calls from your mobile. As long as you are in Bluetooth range, this is known as Intelligent Proximity.
Add Bluetooth #
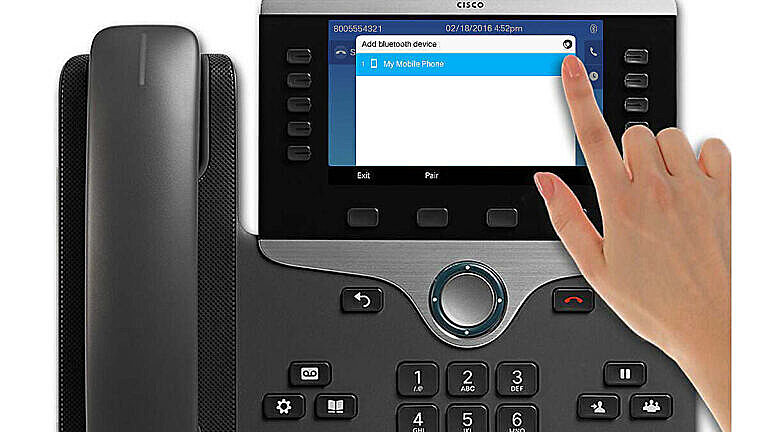
Next, select Add Bluetooth device, and your desk phone begins searching for available devices.
At this point, you may need to put your phone or Bluetooth device to “pairing” mode. Please follow your devices appropriate directions to enable pairing.
When your device appears in the list, select it and press the Pair softkey.
Pairing #
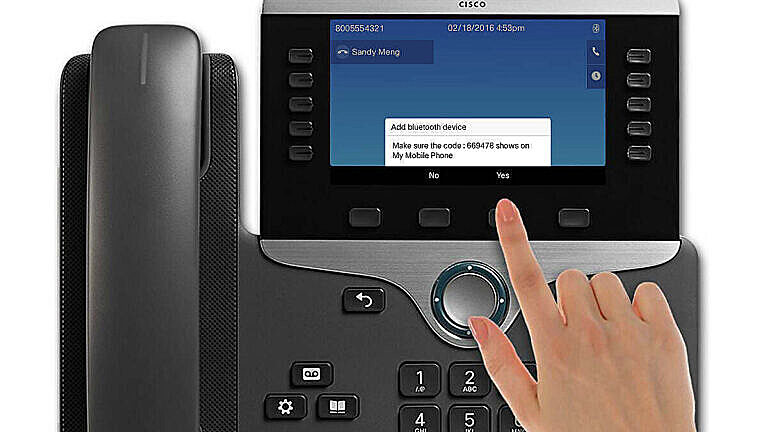
While pairing, a window with a code will appear on the screen asking you to confirm. The device you are trying to connect should also be showing the appropriate code. Select Yes.
A screen will appear briefly saying the device is connected, and the Bluetooth symbol in the upper right will change from hollow to solid. If you have connected a mobile phone, a phone icon will also appear.
Storing Contacts #
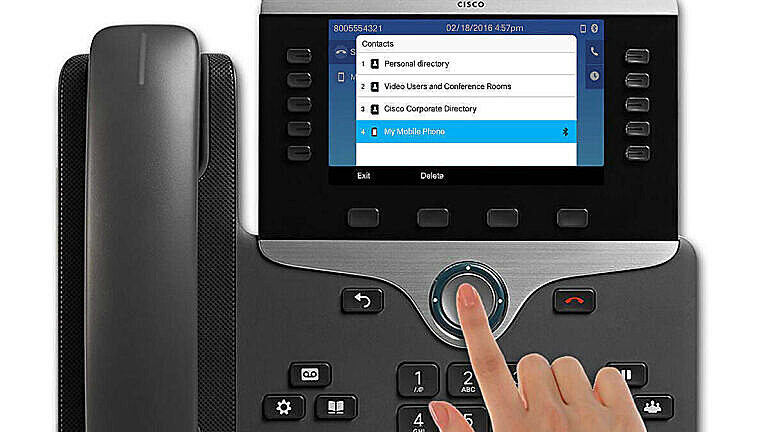
Then you will be asked if you would like to store your mobile phone contacts on your desk phone. If you are using a shared desk phone, select No, and your contacts will be removed when your mobile phone un-pairs with the desk phone. If it is a personal device, select Yes and the Contact Directory will now display an additional directory for your mobile phone contacts.
Select your mobile phone directory and you will be able to scroll through your phones contacts, and quickly call a contact’s primary number right from your desk phone.
Select Show Details to see their full contact information, along with their alternate phone numbers.
Voicemail Access #
To Log In #
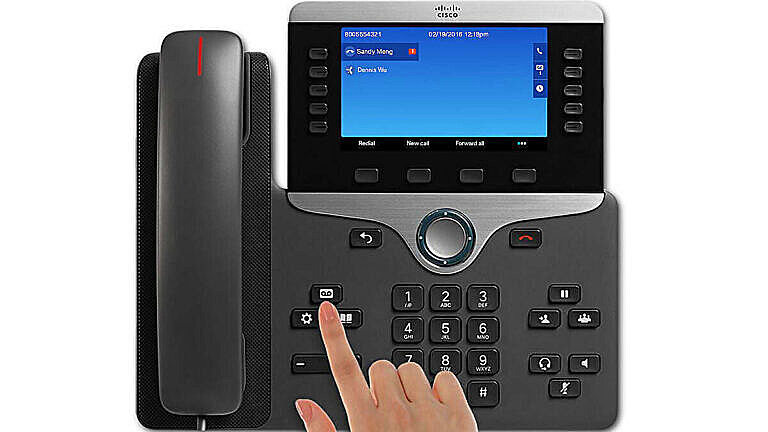
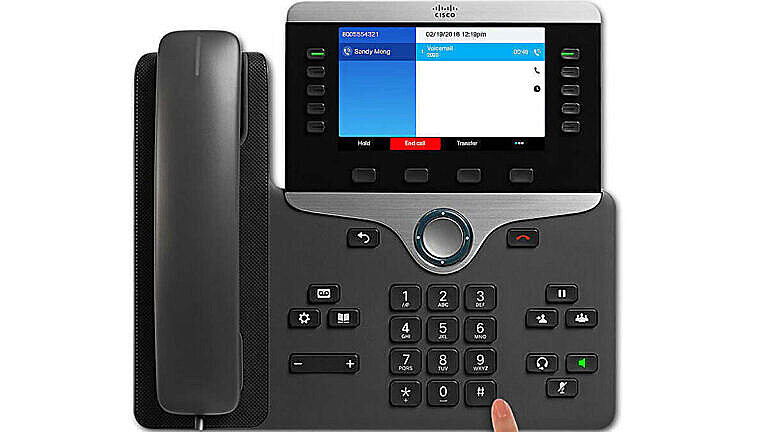
To log on from your extension, press the Messages button on your phone. Enter your password and then press the pound key.
Setup #
The first time you log on to voicemail, you will be asked to follow through with setting up your voicemail box name, greeting and password. Please follow through with all of the steps or you will be asked to set up your voicemail the next time you call in.
Outside Login #
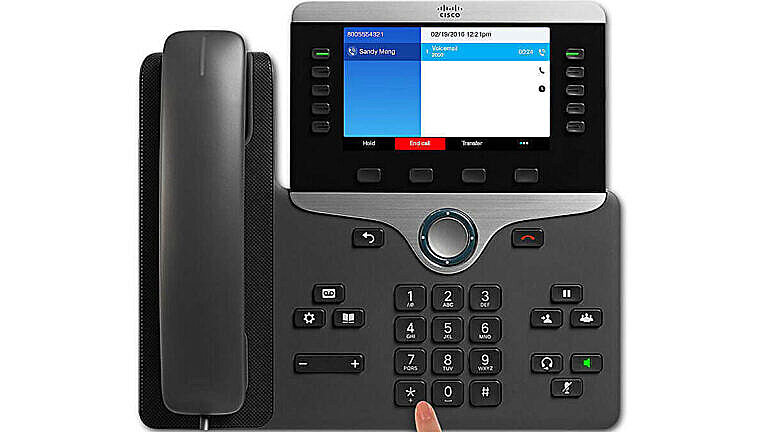
To Log into your voicemail from outside of the system, dial your external voicemail number, and then press the star key.
If you do not know the remote voicemail number for your site, just dial your telephone number and press the star key when your greeting answers.
When prompted to enter your ID, enter your full telephone number and press the pound (#) key. Enter your password then press the pound key.
Extension Mobility #
To Log In #
- Press the Application Button (which is marked by a gear icon)
- Select EM Service (the name can vary).
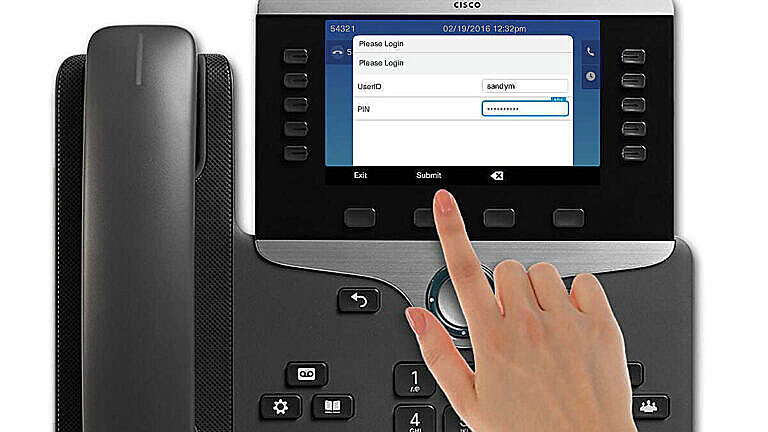
- Enter your user ID, which may be your Network user ID, and your PIN (which is typically provided by your system administrator).
- If prompted, select a device profile.
After you sign in to EM, the phone adopts your user profile, including your phone lines, features, established services and web-based settings. Your system administrator sets up Extension Mobility for you.
If you share a desk, always remember to log out at the end of the workday. This ensures a successful login for the next person using the phone.
To Log Out #
- Press the Application Button (which is marked by a gear icon)
- Select EM Service (remember, the name can vary).
- When prompted, press the Yes softkey.
Change your EM PIN #
Note that you can also use the Log Out screen to change your EM PIN.
- Select Set PIN
- Enter your Current PIN then your new PIN
- Confirm your new PIN then press change
